Been lurking around here for a couple years and thought I would share some info and pics on replacing the oil pressure switch on my wife’s 2010 Santa Fe (3.5L). After 73K miles, this is our first mechanical issue of any kind with this car. The switch was not covered under the power train warranty, and after a $935 quote from our local Hyundai dealer, I decided I would make time to replace this $16 part.
The Symptoms
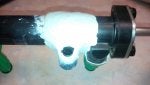
The oil pressure light started flickering, so we took it to the local dealer for a diagnostic. They said I had installed the o-ring on the oil filter cap incorrectly (I do the oil changes) and sent me on my way. A few days later, the oil pressure light was still coming on, and we found oil leaking on the garage floor. Oil was dripping from this area:
![Image]()
(borrowed this pic from here...my stupid phone camera malfunctioned...but the leak looked exactly the same)
We took the car back to the dealer and the diagnosis was a bad oil pressure switch. They also wanted to replace the oil filter housing and the pressure switch housing (both unnecessary, in my opinion). The service guy explained that the $935 repair price was high because the switch and housing are buried under the intake manifold. Lots of stuff has to come off before everything can be replaced.
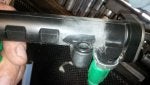
The reason the oil leaks where it does, is because oil from the leaky switch ends up pooling in the “valley” in the center of the cylinder block.
![Image]()
There is a small hole in the valley, which drains the pooled oil. That’s what eventually ended up on the garage floor.
The Preparation
A couple years ago I bought a PDF version of a service manual for the Santa Fe. It’s about 1200 pages long and has step by step instructions for many things, including removal of the intake manifold. The illustrations (drawings) aren’t great, but the manual is a good reference and helped me prepare for the task.
I was also sort of prepared for a long day or two of work, based on my experiences with replacing lower intake manifold gaskets on a couple of GM 4.3L engines. Thankfully, the 3.5L engine on the Santa Fe involved a lot less time and work.
Tools needed (the ones I can remember, anyway):
· 10mm, 12mm and 13mm sockets
· 6mm Allen-head socket
· 24mm deep socket (with thinnest walls you can find)
· Phillips head screwdriver
· Small flat blade screwdriver to help unclip electrical connectors
· Standard pliers to remove hose clamps
· Needle nose pliers to help remove the clips that secure the wires
· Mechanic’s mirror to help locate a hidden 13mm bolt
The Task
The step-by-step instructions for removing the intake manifold are here. I won’t describe all the steps, and I didn’t take pictures for every step, but here are some highlights and advice:
![Image]()
![Image]()
The Symptoms
The oil pressure light started flickering, so we took it to the local dealer for a diagnostic. They said I had installed the o-ring on the oil filter cap incorrectly (I do the oil changes) and sent me on my way. A few days later, the oil pressure light was still coming on, and we found oil leaking on the garage floor. Oil was dripping from this area:

(borrowed this pic from here...my stupid phone camera malfunctioned...but the leak looked exactly the same)
We took the car back to the dealer and the diagnosis was a bad oil pressure switch. They also wanted to replace the oil filter housing and the pressure switch housing (both unnecessary, in my opinion). The service guy explained that the $935 repair price was high because the switch and housing are buried under the intake manifold. Lots of stuff has to come off before everything can be replaced.
The reason the oil leaks where it does, is because oil from the leaky switch ends up pooling in the “valley” in the center of the cylinder block.

There is a small hole in the valley, which drains the pooled oil. That’s what eventually ended up on the garage floor.
The Preparation
A couple years ago I bought a PDF version of a service manual for the Santa Fe. It’s about 1200 pages long and has step by step instructions for many things, including removal of the intake manifold. The illustrations (drawings) aren’t great, but the manual is a good reference and helped me prepare for the task.
I was also sort of prepared for a long day or two of work, based on my experiences with replacing lower intake manifold gaskets on a couple of GM 4.3L engines. Thankfully, the 3.5L engine on the Santa Fe involved a lot less time and work.
Tools needed (the ones I can remember, anyway):
· 10mm, 12mm and 13mm sockets
· 6mm Allen-head socket
· 24mm deep socket (with thinnest walls you can find)
· Phillips head screwdriver
· Small flat blade screwdriver to help unclip electrical connectors
· Standard pliers to remove hose clamps
· Needle nose pliers to help remove the clips that secure the wires
· Mechanic’s mirror to help locate a hidden 13mm bolt
The Task
The step-by-step instructions for removing the intake manifold are here. I won’t describe all the steps, and I didn’t take pictures for every step, but here are some highlights and advice:
- Take lots of pictures. When it’s time to put everything back together, you won’t remember where everything went…trust me.
- Before starting this project, fire up the engine and then pull out the fuel pump relay. Run the engine until it dies. This way, the intake manifold will be clear of fuel, and it won’t spill out when you remove the intake manifold. This also gets rid of some of the pressure in the fuel line, making it a little easier to unhook the line from the manifold. (Note: I didn't actually do this because I forgot about it until after I started disassembling stuff. But it always worked for GM's 4.3L V6 engines, and I'm assuming it works the same on the Santa Fe engine)
- Plastic engine cover just pulls right off. Wasted about 5 minutes figuring that out.
- There's a bracket behind the "surge tank" that has to be removed before that piece comes off. This 13mm bolt is hidden, and you probably won't find unless you have a mechanic's mirror. Here is the general location:

- Not everything listed in the manual needs to be disconnected or removed. Here’s short list of things I did not remove, which were instructed by the manual:
- Large wiring harness and plastic guide on front side of the engine. If you disconnect enough electrical connectors, this can be pushed aside.
![Image]()
- Did not touch the ignition coil connectors.
- During disassembly, I didn’t remove the injector delivery pipes on top of the lower intake manifold, but I did take these out for reassembly. They get in the way of the lower intake manifold bolts (6mm allen head bolts), and it worked better to torque the lower intake bolts without the pipes there. The pipes come out pretty easy, after removing the 5 bolts that hold attach them to the upper intake manifold (the injectors that are connected to the pipes just pop right out).
- Did not remove the metal radiator pipe that goes through the center of the “valley”. The pipe gets in the way of the oil pressure switch, but with a little creativity, I was able to find a combination of sockets and extensions that I could squeeze into the valley and get access to the switch.


- If you don’t have to remove the radiator pipe, I’m not sure if there’s any need to drain the coolant. Getting access to the drain plug on the radiator requires removal of the plastic underbody shield. It’s not difficult to remove the shield or drain the coolant, but it adds time. I only drained enough to get the coolant level below the intake manifold….may not have been necessary.
- Probably goes without saying, but keeping things clean is pretty important. I tried to cover any holes that lead to things like fuel injectors and cylinders.
- The new oil pressure switch came with pipe sealer already on the threads. If you happen to get one without sealer, the Internet is full of opinions on what kind of sealer to use (if any).
")