Hyundai Forums banner

Sonata Replacement Engine Splash Shield

1 reading
26K views 37 replies 10 participants last post by  drizler  
#1 ·
Hyundai replacement shields are over $ 200.

After market one is $ 51.

Anyone have any idea if the after market ones are any good for replacement.

Mine is hanging down on right rear.

regards,
tj
 

Attachments

#2 ·
Who has them for that price? Mines been busted since I hit an interstate alligator a couple years back. The best I could find back then was well over 100 so I fixed it myself. Not the nicest repair and hangs down further on a car that sits too low to begin with.


Sent from my iPad using Tapatalk
 
#8 ·
I’m not sure that such a great idea. With that engine have an aluminum base And it’s sitting so low down to the ground I don’t think I’d want you to Byam for Coldwater being tossed on it when hitting puddles In very cold weather. Remember aluminum doesn’t take kindly to shock cooling and besides it does keep a lot of the slop and gunk off of everything


Sent from my iPad using Tapatalk
 
#6 ·
I just looked at splash shield when getting snows changed, the shield on my vehicle is two piece, right side and a left side.
the right side where it was hanging down at where you change oil.
the tech just took a tie strap and put it back in place, a quick fix.
have uploaded pic. of right side shield
 

Attachments

#7 ·
Right; it's a two piece that is attached in the center (both sections tied together) and on sides, front and back. When I have taken it down, I've just taken out all screws where it attaches to the frame.


So are you having an issue with one of the attachment points to the subframe or that the plastic is broken and you can't reattach it?

If broken, you could always put a piece of strap and drill some holes then secure with bolts. Don't have to be big and you can always spray paint black. You don't see that thing unless you lift the car anyway.

Sent from my SM-G930P using Tapatalk
 
#9 ·
My car is 8 yrs old with the bottom covered and see little difference as far as corrosion from my much older Buick with aluminum oil pan and transmission housing. In a lot of respects the shield will trap moisture...without one, it will dry-out better. The shield is probably there for better aerodynamics. :nerd:
 
#11 ·
Got to remember that the manufacturer must seem to believe they add some value, as with all their cost cutting they would certainly leave them off.

In addition to the above reasons, I believe that the airflow through the radiator is directed "around" the engine, then down, and probably helps fuel mileage slightly with reduced drag from air moving under car/aerodynamics.
 
#12 · (Edited)
"...I believe that the airflow through the radiator is directed "around" the engine, then down..." Pure conjecture on your part.
"...and probably helps fuel mileage slightly with reduced drag from air moving under car/aerodynamics." As I already mentioned...but thanks.

There are folks here...on many models that have them and leave them off, because they're a PITA and don't have access holes!
 
#13 · (Edited)
Certainly not conjecture on my part. How can air not go through the rad and around, or maybe you might think it goes through the engine, when under belly pans are in place? Geez, our modified RX7 Turbo has an under belly pan that completely encloses the little rotary and I assure you the air has got to go around the engine and down under the firewall as there is no other place for it to travel, but that also must be conjecture on my part.


The only item you mentioned was aerodynamics, saw nothing about fuel mileage, dreaming again?
 
#14 ·
"Conjecture" is not say you're wrong is it? How much more air would go through the radiator if the splash guard was removed? Air going around the motor does literally nothing to cool it...this is all done by the radiator, coolant, and the coolant pump.
And if you don't know that aerodynamics goes hand-in-hand with drag vs mileage...then this is your Dah moment. :huh:
 
#16 ·
The splash shield is meant to streamline air under the car and is primarily a MPG addition. Air routing is taking into consideration during design.

With my MR2, people kept taking the bottom panel off at the fire wall and using "ram air" at rear pillar to force "cooling air" into the bay. Little did they know that the OEM design of airflow was from the bottom of the car, through the engine bay and out the vents in the hood.

I don't know about you guys but I spend more time driving the car than working under the car so Ill take the "inconvenience" two or three times a year that I need to access the underside of the car and take the MPG gains.
 
#19 ·
A lot of them "inexpensive" panels lack the rigidity that the factory Hyundai part has.. cheap panels are flimsy like soggy cardboard.. factory part is inject molded with reinforcement ribs to add rigidity..

I see the cheap stuff body shops forced to use by insurance company trying to save a few dollars..
 
#22 ·
Good point and one I thought of on day 1. I would’ve been up there with a holesaw in a quick minute but I don’t like screwing around with anything it’s under warranty like that. Leaving in an out if they decide they wanna push it. Don’t forget our Elantra bit the dust through no fault of anybody’s at 46,000 miles and it’s nice to not have them be able to point to something and say no.
I’m not normally all that picky about doing simple things like that even on something under warranty but with all the Sonara headaches going on I didn’t trust that Elantra any further. I guess I foresaw the future .............


Sent from my iPad using Tapatalk
 
#26 ·
I do...one huge one. Only take about 11 10mm bolts to get at it on my 2011. You pull the center front second to last and the rear center bolt last. Reverse install.


Access holes suck. It still drips and sprays all over the inside and my OCD cannot tolerate it. I pull shield every time, clean the inside before re-installation. Same thing on my Fusion. I am not trying to set an oil change time record doing an oil change.
 
#25 ·
For a simple service, it adds a bunch of time to waste.

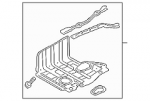
My 2011 shield is 5 pieces. The 1st smaller shield is held in with two plastic pushed in screws and a couple bolts taken off with a 10mm socket. Its the small under bumper shield that needs to be removed in order to get at the bigger shield, which is 4 pieces. You can take the big shield off in one big piece, or pretty much any of the 4 pieces. Get a lithium or air ratchet. With vehicle on ramps and on the typical DIY mechanics creeper, you can zip off all the bolts in a minute, and align/reinstall the panel in 2 minutes. Much easier when you're on a lift. Cranking with a manual ratchet/socket just takes more time. For my 2011, this shield is OVERLY complex and IMO opinion, a waste of manufacturing money.

I am glad that the oil drain plug and oil filter have access ports.

IMO, if your shield is damaged or ripped off, ANY shield is better than none. I have no problem with the flimsy aftermarket stuff. IMO, you want a shield, ANY shield, as it helps control airflow thru the engine compartment for proper cooling, and keeps all the undercarriage splash from destroying everything.

Without the shield, on a few cars, my alternator, power steering, and A/C would quick working with each puddle splash. Don't even ask about the undercarriage wash at the car wash without a splash shield. Another one of my cars would overheat without the shield. So, its not for aesthetics or aerodynamics only.
 
#29 ·
The wrench is used because I can't get my fat hands up there to bring the filter down. You could punch a hole in it and let it drain for a while? :closedeyes:
 
#30 ·
Its faster for me to remove the whole shield and have access for the whole area. I can look around for any other possible leaks or issues.

And changing the oil while on ramps isn't to optimum way to properly do it. But then again it takes me over an hour to change the oil and filter because I let it drain that long because I have that luxury. And yes, I have to raise the jack to get under it to remove the back screws and the lower it back down.
 
#33 ·
Is there a consensus on the best adhesive to use to repair the splash shield? I an unsure what kind of plastic they are made of. Mine has a tear, sort of like if you took a sheet of paper and started to tear it in half but stopped halfway down. I am planning to glue and stitch it, maybe with zip ties. Thanks.
 
#35 ·
Just take a piece of thin tin sheet metal ect.. lap it well by say 3” hammer it down nice and tight if necessary to lay flat then either shoot some sheet metal screws or drill and pop rivet. Either will work well. If you want extra strong and it’s on the edge wrap the tin so it’s sandwiches both sides. Squeeze it tight along the fold with vise grips the. Pop rivet or screw. Much easier to do off the car.


Somebody commented why so much bellyaching. About dropping that Elantra no filter hole pan. Here’s why. It’s loaded with those nasty push pins. Try getting all of those in and out without breaking a couple. Easy on a lift a royal PITA on your back. Secondly and far worse wait till one of those cheap OEM 10 mm head screws freezes in the insert due to rust. Break one of those off and you will start to hate life as it’s a steel bolt in a steel insert set in PLASTIC. No torch as is the typical method. Drilling that out is a major hassle and since it’s up front you really can’t leave that one out or it dangles a bit ( not good in front). IIRC there’s also no place nearby to sink a self tapping screw or similar.
Better yet mine was coated in Never Seize:crying2: and it still rusted in.
There that’s a really good explaination why not having the oil hole really sucks.:whistling::whistling::whistling:
 
#36 ·
Good thought on the repair; I'm starting to think that debating over tape, glue, stitching, tin with screws, etc., is silly, that the differences between their relative efficacies is much less than the difference between what I have now and any of those repairs.

Regarding those 10mm bolts, when did you sneak into my garage and look at my shield? I just bought my 2011 this year and some previous mechanic replaced one of the bolts with a non-OEM bolt (maybe different pitch?) and now the bolt is frozen to the insert, and the bolt and insert turn freely together in the plastic support brace when you try to remove the bolt. I had to remove the support brace still attached to the shield to get the shield off.

And you are right that drilling out and repairing it is a fool's errand. I am thinking maybe I'll grind/drill it out (unconcerned with how that hole/inset/bolt end up) and drill a new hole nearby in the shield and brace. Then instead of trying to put an insert in the new hole, maybe epoxy a nut to the inside/upper side of the hole to accept a bolt.

I am not sure how the insert is attached to the brace; I am guessing threaded and glued? Anybody know? If I could get the insert out of the brace neatly, I would just use the existing hole and epoxy a nut to its other end. Probably smarter (easier, certainly) would be to just use a zip tie to attach the shield to the brace at the location of the crap bolt. For as seldom as the shield comes off, the minimal time and expense of using a zip tie probably makes the most sense.
 
#37 ·
As far as the inserts set in plastic,, anti-seize the bolts, and just snug them up,, no need to go crazy with hammer them down with cordless gun,,

I hear "rip - ZIPPPPPPPPPPPPPPPPPPPPP" all day long across shop from quick lube kids and cordless drivers.. car come back down road for something I have to remove belly pan for and my air drive 1/4" gun wont touch them, they been hammered by the kids, and rust has seized the screw threads

Been many a time I have to take a 6mm tap and run the holes to cut the junk out of them so bolts go back in smoothly
 
#38 ·
I switched all mine to stainless after the breaking incident. And just like you mentioned earlier it was my good old Dewalt drill driver that snapped it. Just wasn’t expecting any to stick, [emoji847] my bad. Sometimes ya gotta be gentler on the trigger............


Sent from my iPad using Tapatalk