Well here’s a fun Saturday project. If you’re thinking of doing the Hyundai OEM spoiler install, here’s how it’s done. It’s pretty easy if you have the right tools & materials. It took me about 2 hours, not including an hour of dry time. Aside from the obvious stuff, some things you'll need include: primer, sealant, an awl or punch, deburring drill bit, swivel socket adapter, and patience.
I ordered the spoiler from Lakeland Automall (eBay “lakelandautomall”) in Florida. It cost me $175 shipped, including having it painted to my factory color, sparkling ruby. It took a little over a week from order to delivery. I unpacked the spoiler and was very happy with the paint job, it looks beautiful.
![Image]()
The included template is a bit tricky to work with. You line it up on the left edge of the trunk, press to tape it down, and punch the holes. Then you undo all the tape except the two pieces at center, which serve as a hing, and you flip it to the right side of the trunk. If you don’t have it positioned properly on the left side, it will be crooked when you flip it. I had to keep doing & redoing this step, partly because my template had a lot of bends in it from shipping. It helps to pop the trunk and have it open a couple inches while positioning the template.
![Image]()
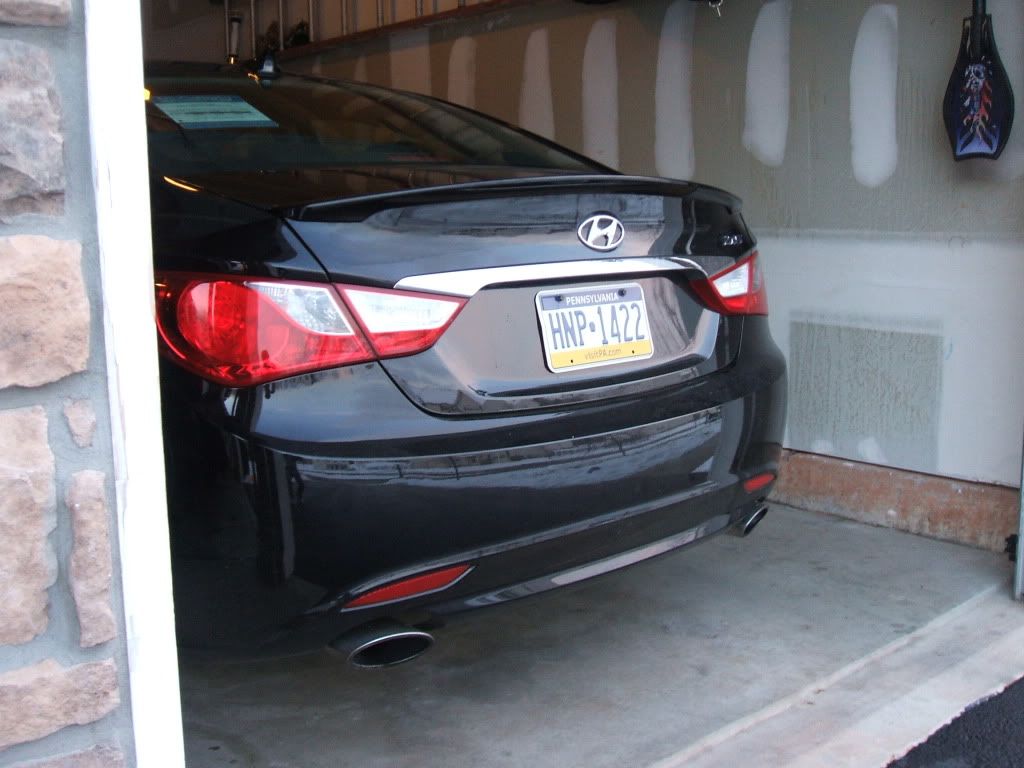
A test fit before going to the point of no return.
![Image]()
Once the template was in place, it was time to punch the holes, which I did with an ordinary awl and a hammer. One whack of the hammer makes a pretty deep indent!
![Image]()
After all 5 holes are punched, the template is removed and the real fun begins. First you drill each hole with a 1/8” bit.
![Image]()
Then you drill again with a 3/8” bit. This bit is much larger than the bolts on the spoiler, but that will allow some leeway to move the spoiler around for perfect positioning.
![Image]()
After the holes are drilled, they need to be deburred. I didn’t have a tool for this, so I used a round file. Not as good as a deburr tool. Once that was done, all the metal chips were vacuumed up, and the metal around the holes was painted with primer. I used a Rustoleum printer, not a specific automotive primer.
The directions say to wait until the primer is dry. That would be 24 hrs, which wasn’t gonna happen. I used a hair dryer and let it sit for a half hour, until it was tacky to the touch. (I doubt most lot installers even wait that long). Next the directions recommend a coat of paint. I didn’t have any on hand, so I skipped it and went right to the sealant. I applied clear silicone sealant, and let that sit for about a half hour.
![Image]()
Now it's time to install the spoiler. Wipe the surface of the trunk where the spoiler will sit with a 50/50 water/isopropyl alcohol mixture and dry it off. The back of the spoiler has doubled sided tape, which needs to be peeled back and exposed. Seat it through the holes.
As mentioned, there’s some play. Carefully position it so it’s properly aligned right to left, and isn’t crooked. It's not easy to reposition once the tape contacts the trunk, so try and set in as close to perfect as you can.
Attach the five nuts from inside the trunk, tightening them equally. The two outside edge nuts are almost impossible to reach with your hand. I used masking tape to tape the nut to my socket, so I wouldn't drop it down into the trunk lid. You'll need a swivel adapter to make this easy, and I'd recommend a small 1/4" drive. My torque wrench starts at 45 inch pounds, but the spoiler should only be torqued to 20 inch pounds. I had to wing it. Ahem.
Finish up by reinstalling the interior trunk liner and pull handle, and it’s time to take final pics!
![Image]()
![Image]()
![Image]()
![Image]()
One thing I noticed after the install is the trunk no longer goes all the way up when popped, because of the added weight of the spoiler. This is actually a positive for me, I don't like the trunk opening all the way when it's popped.
All in all, this was a nice upgrade for the car. If you have patience and do it yourself, it's really not that expensive, and it looks so much nicer.
I ordered the spoiler from Lakeland Automall (eBay “lakelandautomall”) in Florida. It cost me $175 shipped, including having it painted to my factory color, sparkling ruby. It took a little over a week from order to delivery. I unpacked the spoiler and was very happy with the paint job, it looks beautiful.

The included template is a bit tricky to work with. You line it up on the left edge of the trunk, press to tape it down, and punch the holes. Then you undo all the tape except the two pieces at center, which serve as a hing, and you flip it to the right side of the trunk. If you don’t have it positioned properly on the left side, it will be crooked when you flip it. I had to keep doing & redoing this step, partly because my template had a lot of bends in it from shipping. It helps to pop the trunk and have it open a couple inches while positioning the template.

A test fit before going to the point of no return.

Once the template was in place, it was time to punch the holes, which I did with an ordinary awl and a hammer. One whack of the hammer makes a pretty deep indent!

After all 5 holes are punched, the template is removed and the real fun begins. First you drill each hole with a 1/8” bit.

Then you drill again with a 3/8” bit. This bit is much larger than the bolts on the spoiler, but that will allow some leeway to move the spoiler around for perfect positioning.

After the holes are drilled, they need to be deburred. I didn’t have a tool for this, so I used a round file. Not as good as a deburr tool. Once that was done, all the metal chips were vacuumed up, and the metal around the holes was painted with primer. I used a Rustoleum printer, not a specific automotive primer.
The directions say to wait until the primer is dry. That would be 24 hrs, which wasn’t gonna happen. I used a hair dryer and let it sit for a half hour, until it was tacky to the touch. (I doubt most lot installers even wait that long). Next the directions recommend a coat of paint. I didn’t have any on hand, so I skipped it and went right to the sealant. I applied clear silicone sealant, and let that sit for about a half hour.

Now it's time to install the spoiler. Wipe the surface of the trunk where the spoiler will sit with a 50/50 water/isopropyl alcohol mixture and dry it off. The back of the spoiler has doubled sided tape, which needs to be peeled back and exposed. Seat it through the holes.
As mentioned, there’s some play. Carefully position it so it’s properly aligned right to left, and isn’t crooked. It's not easy to reposition once the tape contacts the trunk, so try and set in as close to perfect as you can.
Attach the five nuts from inside the trunk, tightening them equally. The two outside edge nuts are almost impossible to reach with your hand. I used masking tape to tape the nut to my socket, so I wouldn't drop it down into the trunk lid. You'll need a swivel adapter to make this easy, and I'd recommend a small 1/4" drive. My torque wrench starts at 45 inch pounds, but the spoiler should only be torqued to 20 inch pounds. I had to wing it. Ahem.
Finish up by reinstalling the interior trunk liner and pull handle, and it’s time to take final pics!


One thing I noticed after the install is the trunk no longer goes all the way up when popped, because of the added weight of the spoiler. This is actually a positive for me, I don't like the trunk opening all the way when it's popped.
All in all, this was a nice upgrade for the car. If you have patience and do it yourself, it's really not that expensive, and it looks so much nicer.
")