Hyundai Forums banner

Intermittent Power Liftgate/Tailgate – 2015 Hyundai Santa Fe GLS LWB 7-Seater model

18K views 11 replies 3 participants last post by  dtrack2007  
#1 ·
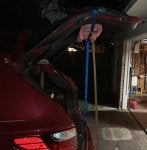
My power liftgate/tailgate is intermittent. Most of the time it does not fully open, see example in this video. Occasionally, it operates fine, which seems to correlate with colder weather.

The following power liftgate reset procedure did not improve the situation:
1. Put the shift lever in P (Park). 2. Partially open the liftgate. 3. While pressing the liftgate (tailgate) close button, press the liftgate (tailgate) handle switch for more than 3 seconds. (the chime will sound) 4. Close the liftgate (tailgate) manually.

I do not believe it is a faulty thermal protection because I don’t get the 3 chimes for that error.
I do not believe it is a faulty anti-pinch sensor because it does not reverse direction.

A quick look at the attached block diagram indicates two potential candidates:
  • Faulty PTGM
  • Faulty drive spindles (lift cylinders)

Anybody know common causes for this, or recommended troubleshooting?

Kind regards,

Craig

Image
 
#3 · (Edited)
Here are the part options I found to replace the hatch liftgate cylinders (exploded view here). Prices do not include tax and shipping.

$702 Powered cylinders OEM
81780-B8100 Right Hand Lift Cylinder 2013-2018 Hyundai Santa Fe
81770-B8100 Left Hand Lift Cylinder

$265 Powered cylinders aftermarket ebay
Rear Right RH Tailgate Power Hatch Lift Support for Hyundai Santa Fe 2013-2019
Rear Left Tailgate Power Hatch Lift Support Strut for Hyundai Santa Fe 2013-2019

Considering the failure rate (1 per 7 years), the replacement cost ($700+ for OEM), and how beneficial this is to our family (low), I am considering downgrading to unpowered lifters:

$234 Down grade to unpowered OEM (Includes upper brackets)
81780-B8000 LIFTER Assembly-Tail Gate,RH
81770-B8000 Lifter Assembly-Tail Gate,LH

$35 Down grade to unpowered aftermarket
PM3609 Lift Supports Depot Set of 2

What would I need to do if I want to downgrade to unpowered cylinders: change the brackets; disable power liftgate software/hardware to avoid error codes? Pros: cost and reduced complexity in future replacements. Cons: manual ops.

Does anybody have the GLS/SE base, no premium/ultimate package (no power liftgate) that can provide comments on manual ops for the hatch?
 
#4 ·
The attached PDF is the service manual summary of the power tailgate/liftgate system: components; operation; schematics; and troubleshooting.
 

Attachments

  • Like
Reactions: dtrack2007
#5 · (Edited)
REMOVE THE GATE PILLAR TRIM AND UNPLUG THE POWER CYLINDERS

Unplugging the faulty power lifters significantly reduces the opening/closing resistance. Disconnecting the power lifter from the circuit negates the back electromotive force.

I used my Tresalto Auto Trim Removal Tool Set to assist in the trim removal process.

Open the Pillar Trim Cap.
Remove the trim mounting bolt (10mm socket).
Fold back the tailgate weather strip to gain edge access to the gate pillar trim. Pull away the trim moving from the back to the front, top to the bottom.
Disconnect the power lifter connector.

Photos and notes are included below, and I also uploaded a video here. The white tape seen on the trim in the video marks the approximate locations for the clips you need to pull out.

 
  • Like
Reactions: dtrack2007
#12 ·
Thanks man! You just saved me a ton of money. Dealer wanted $800 CAD EACH!!! for the power lifters. I found a pair on Amazon for $200 CAD. Really appreciate your detailed instructions, photos and video showing how to remove the trim piece and install the lifters. I spent a day on Google trying to find DYI info specific to my 2017 Santa Fe and didn't find much at all. I tried ChatGPT and it gave some generic advice, some of it completely wrong, BUT one of the sources it referenced was this thread. :) Now just have to decide what to do with the $1,400 I just saved.
 
#6 · (Edited)
DISABLE THE POWER LIFTGATE SYSTEM

To prevent the power liftgate system (PLGS) from interfering with your manual operations, you need to disable the PLGS in the user settings of the LCD Display.

On the steering wheel control buttons, press the Mode button several times until the “User Settings” is displayed on the LCD display. Press the Move button until the Door option is highlighted, then press the Select/Reset button. Press the Move button until the Power Liftgate option is highlighted, then press the Select/Reset button to remove the check from the box. This will disable the power liftgate system.

I created the attached cheat sheet for reference.
 
#7 ·
PROP UP YOUR LIFTGATE/TAILGATE

You will need to prop open the liftgate to change out your cylinders/lifters/struts. I chose to wrap some lumber in a towel and hold that in place with a ratchet strap tie-down, then bring a long piece of lumber underneath for support (see pics). I evaluated other options and this seemed to be the most secure and least likely to damage/scratch the gate. I would be interested in other approaches if you would like to share ideas.
 

Attachments

  • Like
Reactions: dtrack2007
#8 · (Edited)
CHANGE OUT YOUR POWER LIFTERS

Preparation steps:
  • remove the gate pillar trim and disconnect the power lifter connectors
  • prop up the gate

Lessons learned:
  • Remove only one lifter at a time allowing the second lifter to remain in place and assist in keeping the tailgate propped up.
  • Remove the upper bracket first, the one connected to the gate.
  • Pay careful attention to which bracket type is attached to each end of the lifter.
  • Snap the bracket balls into the lifter sockets prior to mounting the assembly.
  • Do not over torque the fastener bolts, you can shear off the head of the fastener.

To change out the power lifters you will need to unbolt the brackets from the gate and body to gain proper access to the lifter ball stud socket clip. First remove the upper bracket 10mm bolts (the bracket connected to the tailgate), then allow that end to rest on the body. At the lower bracket (the one connected to the body) pull out the power cable by prying the grommet outward. Remove the lower bracket 10mm bolts and place the entire assembly on your workbench. Using a 3/16" width blade flat screwdriver, slide the blade under the socket clip and twist the screwdriver blade to lift up the socket clip then pull the bracket ball out of the lifter socket. Do this at both ends of the lifter. Push each bracket ball into the sockets of the new lifter. Prior to reattaching the lifter, I put petroleum jelly on the threads of all four bolts and into the threaded holes, then ran the bolts in/out a few times (trust me, this helps the reassembly go smoother). Reattach the lifter in this order: body bracket; gate bracket. Leave the body bracket very loose while installing the gate bracket bolts to finger tight. Finger tighten each bolt gradually as you wiggle the brackets into position. Final tightening torque is 6.8 ~ 10.7 Nm (0.7 ~ 1.1 kgf.m, 5.0 ~ 7.9 lb-ft). Reinsert the power cable into the chassis hole while routing the connector into proper position on the interior side. Mate the interior connector to the lifter connector. Secure the grommet in place.

Attached are a few notes and pictures to help with the process.
 
  • Like
Reactions: dtrack2007
#9 · (Edited)
DOWNGRADE TO UNPOWERED LIFTERS

I purchased the aftermarket unpowered lifters PM3609 made by Lift Supports Depot. Walmart sells a set of two for $35.92. The unpowered lifters are slightly shorter in length than the powered. This will result in 3” less headroom from the ground to the top of the gate when fully opened.

To downgrade to unpowered lifters, you will need to change your brackets. The powered lifters/struts have 13mm sockets and the unpowered lifters have 10mm sockets.

Here are the part numbers for the OEM 10mm ball brackets.
$68.71 total for the brackets only, Without sport, without power lift gate.
81772-B8000 LH Upper Bracket-Tail Gate LIFTER
81772-B8050 LH lower Bracket-Tail Gate LIFTER
81782-B8000 RH Upper Bracket-Tail Gate Lifter
81782-B8050 RH lower Bracket-Tail Gate Lifter

The vendor may require you supply a VIN for your order. Remember that your VIN is for the powered brackets, so you will need to provide the VIN for a Santa Fe that does not have a powered liftgate. Here is a 2016 VIN you can use: KM8SMDHF7GU144222

Downgrading to unpowered lifters will leave a hole in your chassis at the power cable feedthrough. Plug the hole with Heyco 9693 Flush Mount Black Hole Plug for Auto Body and Sheet Metal. You can purchase the Heyco plugs at Mouser

When the unpowered lifters need to be replaced, use a 1/8" width blade flat screwdriver to lift up the socket clips.
 
#10 · (Edited)
MODIFY YOUR EXISTING BRACKETS WITH 10mm BALL STUDS

At the time of this writing the OEM 10mm ball brackets were on backorder for 4+ months. I decided to modify my powered liftgate brackets to accept a 10mm ball stud.

Here are the parts I ordered for the modification
Ball Stud 10mm ball 5/16"-18 x 3/4" long 303 Stainless Steel 9512K98
Low profile 316 Stainless Steel 3/16" height Hex Nut Super-Corrosion-Resistant, 5/16"-18 Thread Size 94805A110
5/16 flat washers (local hardware store)

A photo summary of the modification process is included below.

Image

Image
 
#11 ·
Here is a summary of the tools and parts I brought over to my buddy's house to complete the bracket modifications and lifter/strut changeout.