

Higher resolution pictures are available here: 2016 Hyundai Accent Center Console Tray pictures, videos, and sounds | SuperMotors.net
Ironically, my initial solution to this was really close to the final one and I almost missed it completely.
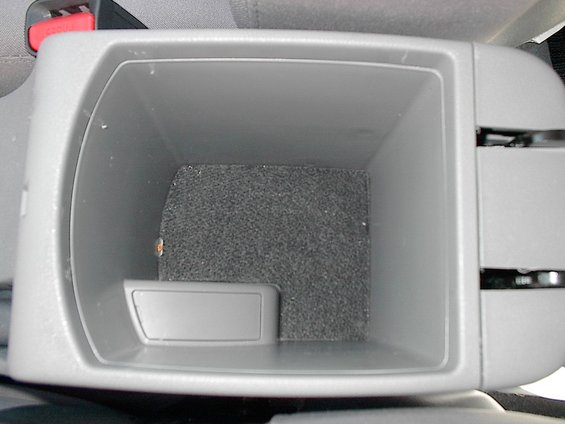
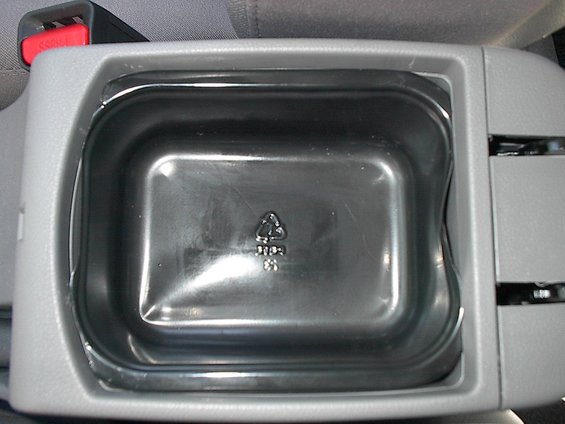
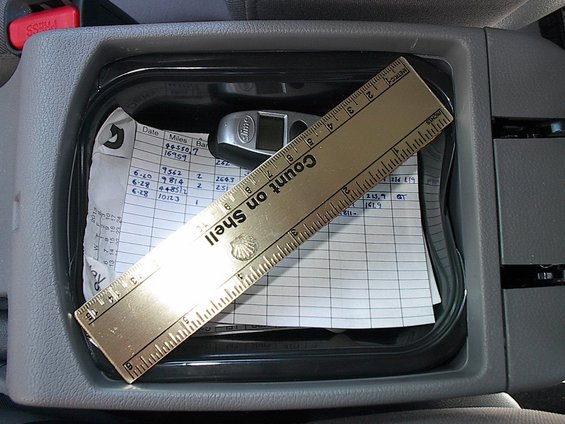
The Accent has a lot of storage space, but not a lot of usable storage. The upgraded trim has a nice storage compartment in the console behind the drink holders. However, while the compartment is deep to hold a lot, it also means that small doo-dads (tire pressure gauge, pens, business cards, note pads) tend to get lost in it. See pic below:
![Image]()
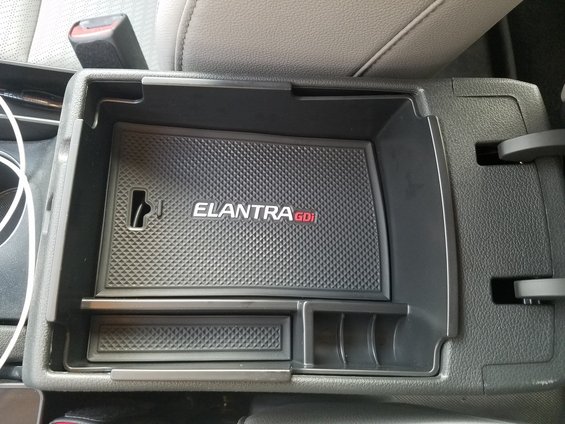
OkieRich's post (pic of Acebmxer's tray below) about a storage tray for the AD Elantra inspired me, and I figured there must be something out there for the RB Accent. As far as I can tell, there isn't.
![Image]()
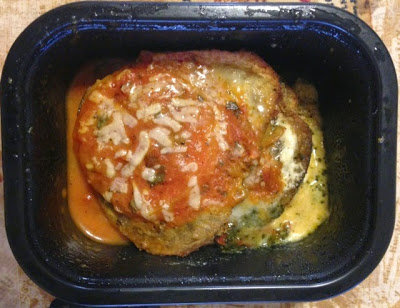
So I looked for my own solution. I don't have a picture of the unmodified container, but I tried various containers around the house. The first (and also the final) attempt was a container for Cedar Lane Baked Stacked Eggplant:
![Image]()
Baked Stacked Eggplant | All natural award-winning low fat frozen entrees | Cedarlane Natural Foods
It dropped right in and the width was about perfect, but the length (fore-aft) was a bit too long, I thought it was fine and then I figured out why nobody made a storage tray for the Accent:
![Image]()
The lid actually has a raised lip that drops into the side of the storage bin (probably to relieve lateral stress on the hinge since the lid also slides forward. So any storage container has to be very thin-walled and an exact fit to allow the lid to close. (Note that there is a groove or mold line about an inch below the top of the storage bin - I'll come back to that later.) I gave up on the eggplant container.
The next attempt was a cut bowl of Nissin Chow Mein Noodles. See pics below:
https://www.nissinfoods.com/products/ChowMein
![Image]()
![Image]()
I tried to cut the bowl just above where the reinforcement ridges end and tried to leave slight tabs to catch in the groove below the top of the console. It worked after a fashion, but it wouldn't support any weight, and it tended to tip backward. It was too large to turn over inside the console, but I wasn't really happy with it. (It was also a bit deeper than I liked, but if I cut it shorter, it would flip over when I tried to take it out.)
I got inspired by this thread and this thread with an injection molded tray, and this thread with a 3D printed tray, but I didn't have access or resources to try the injection molding solution, and I've played with Google Sketchup 3D, but I didn't have the skill to make a 3D molded tray either. I didn't hunt for it, but I think Shazzy's thread linked to a Portuguese (???) forum where he made the base model out of posterboard/cardboard, and I thought that or balsa wood would be good enough for me, but I didn't know if I could pull that off either. I did take a piece of office paper and trace out the dimensions and cut it so I had a rough idea of the dimensions I needed to work with.
The next attempt was the box from a carton of 12-oz cans of Kroger Iced Tea. I cut the base of the carton to match the paper template and then cut the height to match some of the flaps - or about an inch tall - I'm not sure. The box ended up being slightly too wide, so I ending up ungluing the side flaps and stapling them together. See pics:
![Image]()
![Image]()
This worked, but it also wouldn't support a lot of weight and since it was the full width of the storage compartment, it was hard to remove, and without a front flap, it was hard to take out without spilling all the contents. I still wasn't satisfied.
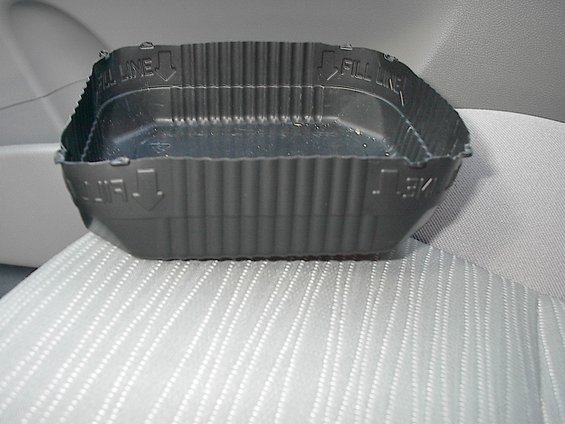
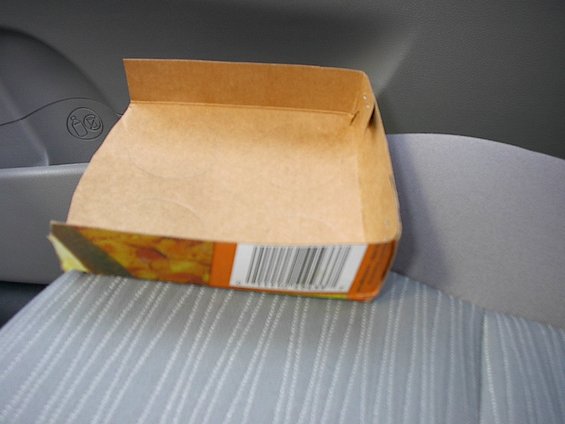
Then, we used another Cedar Lane meal, and I decided to try it again. I'm not sure why, since I knew I had given up on it before, but I remembered it almost worked, and initially I was looking for something that would just drop in without modification. I looked at it in the console, and I figured that if I just trimmed the front and rear "flaps" of the container, it would drop down and the lid would close. See pics (I didn't have a pic of the un-modified container, so I found one from the web):
![Image]()
![Image]()
![Image]()
I simply placed the container on top of the console and scored the edges where the opening met the tray. The edges were very well reinforced, so I found the easiest method was to use tin snips to make the initial outward cuts and then use a utility knife at a 45-degree angle to cut along the line where the flange meets the bowl.
The tray works fine and the side edges lock into the groove in the console so it will support a modest amount of weight. It is SLIGHTLY too wide (maybe 2-3 mm) at the rear which makes it bow in a bit at the back, but that creates a convenient handle to remove it.
The only minor issue is that it is scratching the sides of the console a bit when it comes in and out, but I could maybe trim it slightly more and fix that if it really bothered me, which it doesn't.
![Image]()
(I also typically leave it in the console and only remove it every month of so - not sure how it would hold up to several times a day removal, but so far it is doing fine!)
It took a year to find a solution, but I'm happy with it and hopefully it will help someone else!!!
Ironically, my initial solution to this was really close to the final one and I almost missed it completely.
The Accent has a lot of storage space, but not a lot of usable storage. The upgraded trim has a nice storage compartment in the console behind the drink holders. However, while the compartment is deep to hold a lot, it also means that small doo-dads (tire pressure gauge, pens, business cards, note pads) tend to get lost in it. See pic below:
OkieRich's post (pic of Acebmxer's tray below) about a storage tray for the AD Elantra inspired me, and I figured there must be something out there for the RB Accent. As far as I can tell, there isn't.
So I looked for my own solution. I don't have a picture of the unmodified container, but I tried various containers around the house. The first (and also the final) attempt was a container for Cedar Lane Baked Stacked Eggplant:
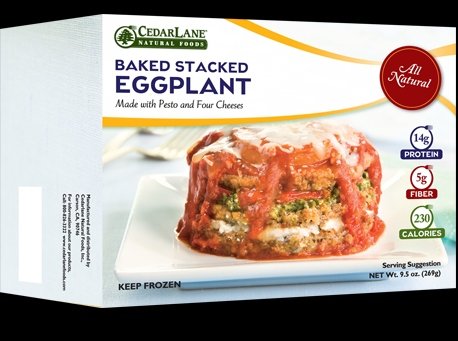
Baked Stacked Eggplant | All natural award-winning low fat frozen entrees | Cedarlane Natural Foods
It dropped right in and the width was about perfect, but the length (fore-aft) was a bit too long, I thought it was fine and then I figured out why nobody made a storage tray for the Accent:
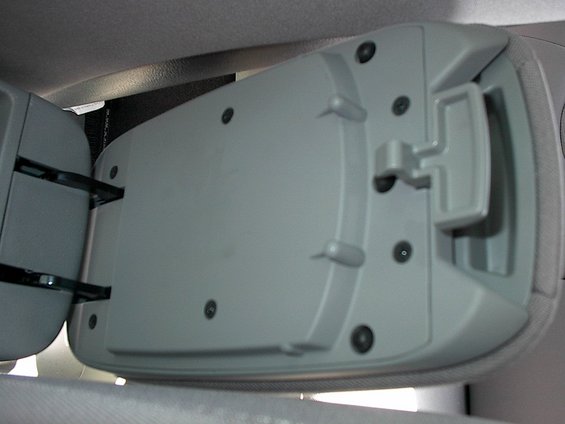
The lid actually has a raised lip that drops into the side of the storage bin (probably to relieve lateral stress on the hinge since the lid also slides forward. So any storage container has to be very thin-walled and an exact fit to allow the lid to close. (Note that there is a groove or mold line about an inch below the top of the storage bin - I'll come back to that later.) I gave up on the eggplant container.
The next attempt was a cut bowl of Nissin Chow Mein Noodles. See pics below:
https://www.nissinfoods.com/products/ChowMein

I tried to cut the bowl just above where the reinforcement ridges end and tried to leave slight tabs to catch in the groove below the top of the console. It worked after a fashion, but it wouldn't support any weight, and it tended to tip backward. It was too large to turn over inside the console, but I wasn't really happy with it. (It was also a bit deeper than I liked, but if I cut it shorter, it would flip over when I tried to take it out.)
I got inspired by this thread and this thread with an injection molded tray, and this thread with a 3D printed tray, but I didn't have access or resources to try the injection molding solution, and I've played with Google Sketchup 3D, but I didn't have the skill to make a 3D molded tray either. I didn't hunt for it, but I think Shazzy's thread linked to a Portuguese (???) forum where he made the base model out of posterboard/cardboard, and I thought that or balsa wood would be good enough for me, but I didn't know if I could pull that off either. I did take a piece of office paper and trace out the dimensions and cut it so I had a rough idea of the dimensions I needed to work with.
The next attempt was the box from a carton of 12-oz cans of Kroger Iced Tea. I cut the base of the carton to match the paper template and then cut the height to match some of the flaps - or about an inch tall - I'm not sure. The box ended up being slightly too wide, so I ending up ungluing the side flaps and stapling them together. See pics:

This worked, but it also wouldn't support a lot of weight and since it was the full width of the storage compartment, it was hard to remove, and without a front flap, it was hard to take out without spilling all the contents. I still wasn't satisfied.
Then, we used another Cedar Lane meal, and I decided to try it again. I'm not sure why, since I knew I had given up on it before, but I remembered it almost worked, and initially I was looking for something that would just drop in without modification. I looked at it in the console, and I figured that if I just trimmed the front and rear "flaps" of the container, it would drop down and the lid would close. See pics (I didn't have a pic of the un-modified container, so I found one from the web):
I simply placed the container on top of the console and scored the edges where the opening met the tray. The edges were very well reinforced, so I found the easiest method was to use tin snips to make the initial outward cuts and then use a utility knife at a 45-degree angle to cut along the line where the flange meets the bowl.
The tray works fine and the side edges lock into the groove in the console so it will support a modest amount of weight. It is SLIGHTLY too wide (maybe 2-3 mm) at the rear which makes it bow in a bit at the back, but that creates a convenient handle to remove it.
The only minor issue is that it is scratching the sides of the console a bit when it comes in and out, but I could maybe trim it slightly more and fix that if it really bothered me, which it doesn't.

(I also typically leave it in the console and only remove it every month of so - not sure how it would hold up to several times a day removal, but so far it is doing fine!)
It took a year to find a solution, but I'm happy with it and hopefully it will help someone else!!!


