

Ok, this is a write on how to replace the Upper Control Arm for a 2006-2010 Hyundai Sonata. I believe it’s the same item for 2.4 L and 3.3 L. Because I have not received the Right Hand side yet (it’s out of stock), I am only showing the driver’s side. Though I suspect it’s very similar or identical procedure.
Juts a little background on why I am doing this replacement. If you have similar noise as me, you may consider this replacement. I have had various, very annoying sound coming from both sides – a very loud squishing, creaking (like an old door hinge), and some clunking.
When I had it diagnosed at two different places, they both told me it was from the strut mounts. Well, I changed the strut mounts (Monroe) /struts (kyb) just less than a year ago with bran new parts so I had a hunch that couldn’t have been it. Being that the noise progressed to be worst and worst long after the new mounts were put on, I was certain it couldn’t have been the strut mounts.
So, I actually thought it was the sway bar bushings – The two big ones cushions the sway bar – I changed those to moogs – Though I spent about an hour dropping the engine crate to replace those…it was not the source of the noise unfortunately.
I sprayed silicone on different bushings (sway bar, sway bar link bushings etc…). In the end, the noise got worst and the car sounds like cheap junk. So I figured, like everyone else, it has to be control arm bushing. Now whether the noise is coming from lower or upper bushings is dependent on your situation.
I sprayed silicone on different bushings (sway bar, sway bar link bushings etc…). In the end, the noise got worst and the car sounds like cheap junk. So I figured, like everyone else, it has to be control arm bushing. Now whether the noise is coming from lower or upper bushings is dependent on your situation.
This mod is pretty easy and anyone who has a few tools should be able to do this! Though dealer or other places may only charge you 120 or so dollars to do this, why not break a little sweat, save $, use the money to buy the parts and you’re done.
I got this control arm from partsgeek.com. If you do a search for control arm for our cars, you will get either 1. oem 2. BeckArnley, 3. Raybestos, and a couple of others called “professional grade.” The prices will vary from 40 to 120 a piece; if you look on ebay they have some for about 200 a piece even. Of course I bought the cheapest ones; I’ll be the guinea pig and tell you whether these hold up or not. Actually this LH side one that I got was 36 dollars. It is a Hyundai/Kia part and seems to be genuine. The RH side will come from rock auto next week as partsgeek was out of stock for RH side. The RH side will be BeckArnley for me.
![Image]()
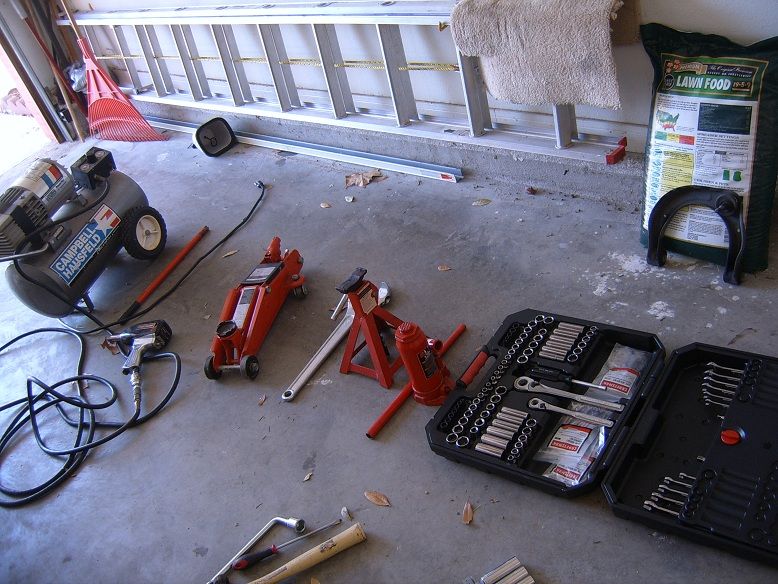
Tools you will need for this replacement are:
- Air tool (optional, I honestly didn’t even need it, but it may help you in some cases)
- Two jacks (almost necessary to have 2 if you’re doing this solo)
- One jack stand (if you have a jack stand you may can get away with just one jack and sit the car on the stand and use the jack to maneuver parts later – I use for precaution)
- Wrench set / socket etc… *14 mm for the bolts that hold control arm
- One of this huge adjustable wrench with big arm (will explain later)
- Zip ties (optional)
- 2x4 pieces of wood (optional – will explain later)
- Torque wrench – (optional but I recommend since you’re taking your wheels off)
Step 1
Loosen lug nuts (don’t take them off yet, simply loosen)
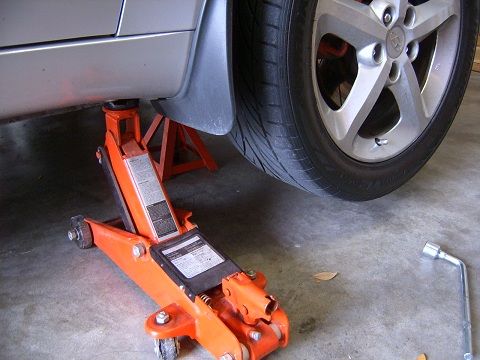
Step 2
Prop car up with jack – Put jack stand under car frame – Take out lug nuts and take wheel off.
![Image]()
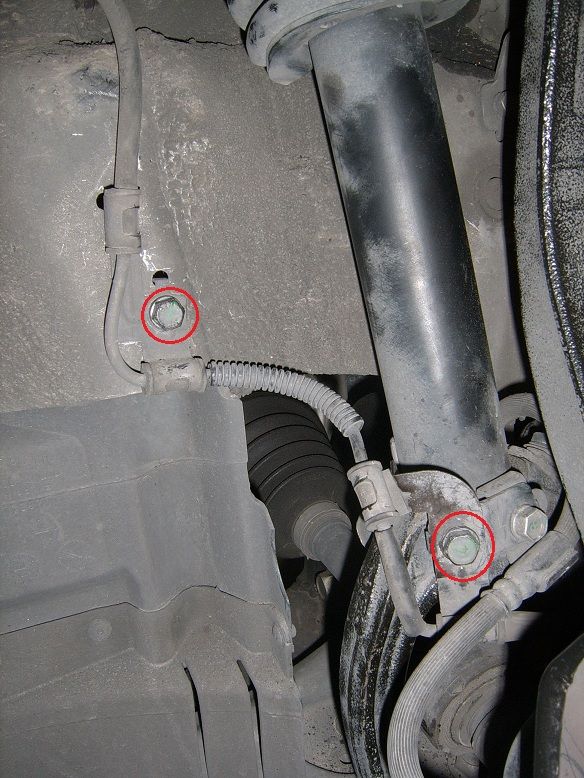
Step 3
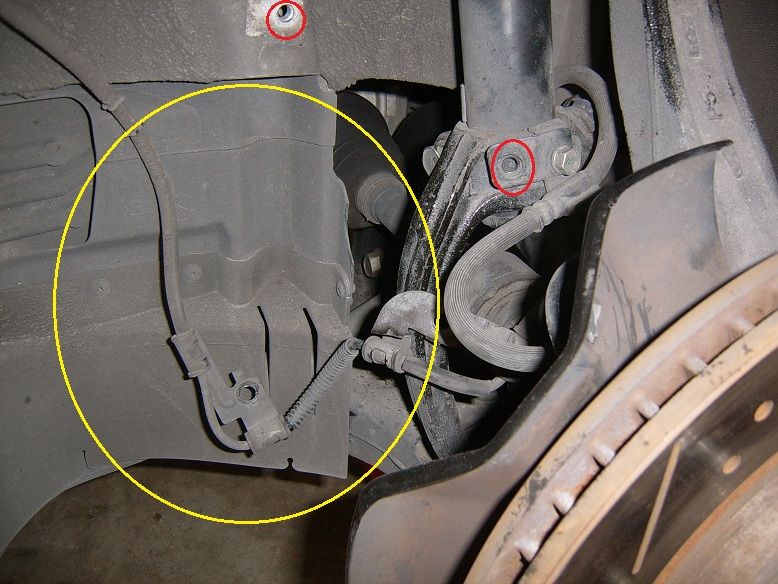
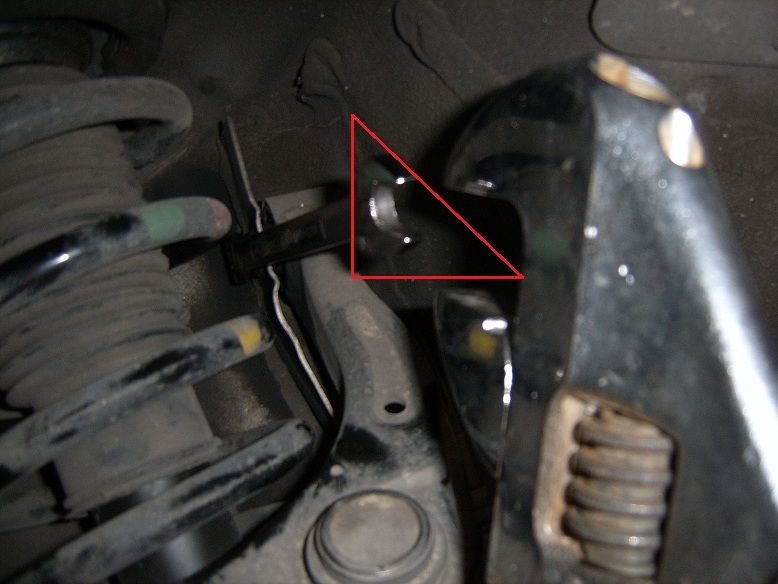
Locate these two small bolts that hold the brake fluid line – Take these two off ( marked in red in picture ).
![Image]()
You want to do this so the line will not hold the weight of the main fork when it will loosened – It will flop from side to side and it’s quite heavy – The line should be loose like in the picture below.
![Image]()
You want to do this so the line will not hold the weight of the main fork when it will loosened – It will flop from side to side and it’s quite heavy – The line should be loose like in the picture below.
Step 4
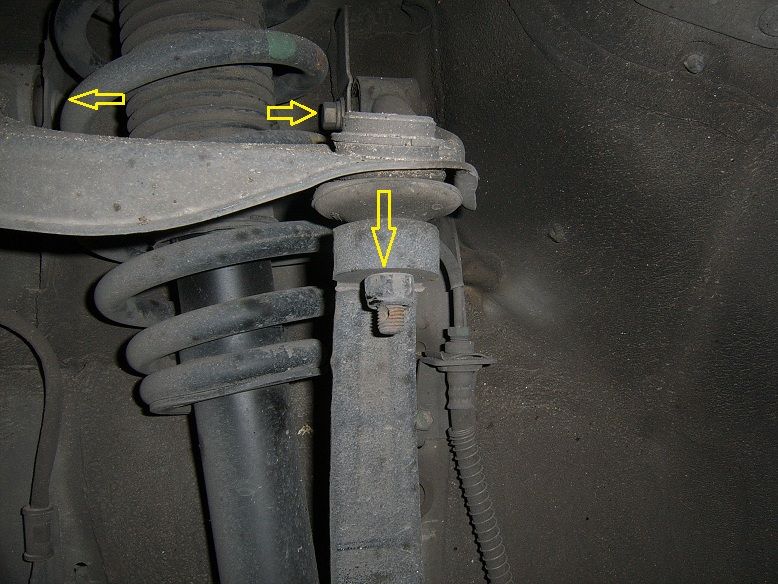
Locate 3 main bolts that holds and secures upper control arm - 3 main bolts in yellow arrows in pic below.
![Image]()
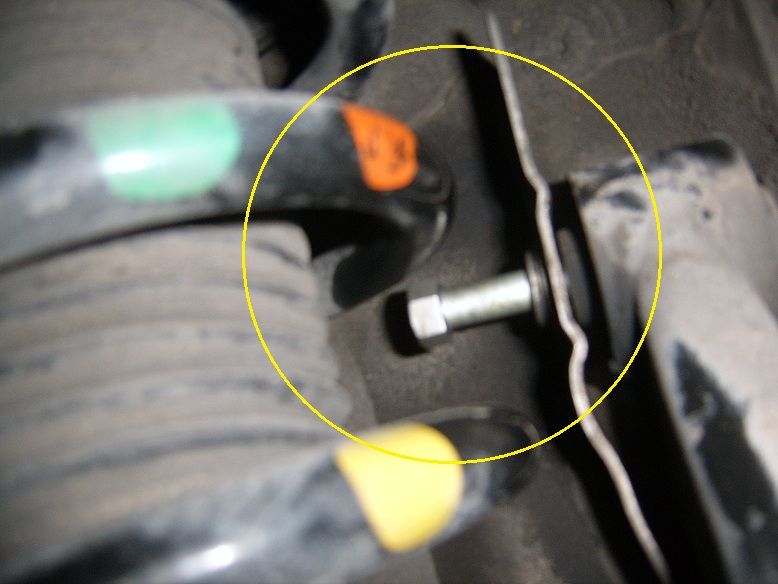
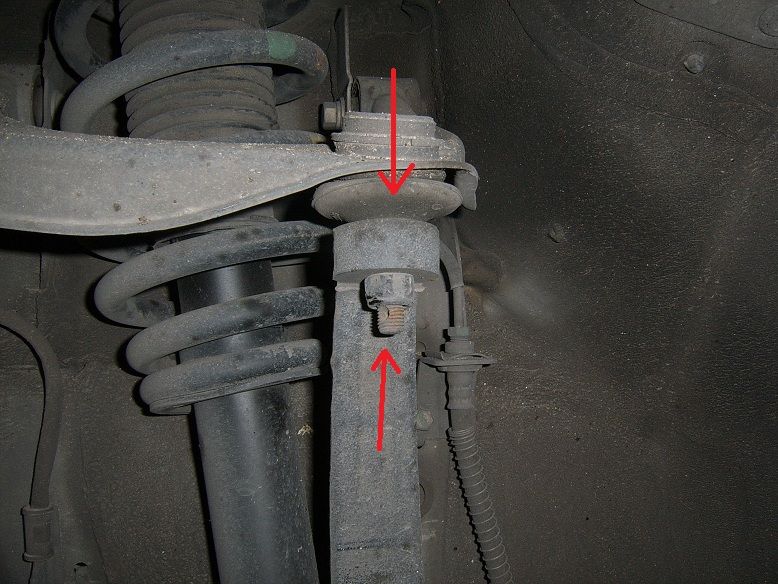
Now locate ball joint bolt (circled in pic below)
It is secured by a 14 mm nut and has a cotter pin going through the bolt – Take off cotter pin by gently tapping it out.
![Image]()
Now locate ball joint bolt (circled in pic below)
It is secured by a 14 mm nut and has a cotter pin going through the bolt – Take off cotter pin by gently tapping it out.

*For some reason my new control arm did not come with either a pin nor bolt; hence I used the original one*
Step 5
Use air wrench to take out the main nut on the ball joint. You could probably use arm strength for this.
Use air wrench to take out the main nut on the ball joint. You could probably use arm strength for this.
Step 5
Once you removed the nut, you will have to prop control arm so that ball joint bolt will come out of the hole in the fork. You can use un-used second jack and use a 2X4 and use that wood to push up on the control arm. (Orange square is 2X4 in this pic below) - Push it against your jack on floor and push up until ball joint pops out.
![Image]()
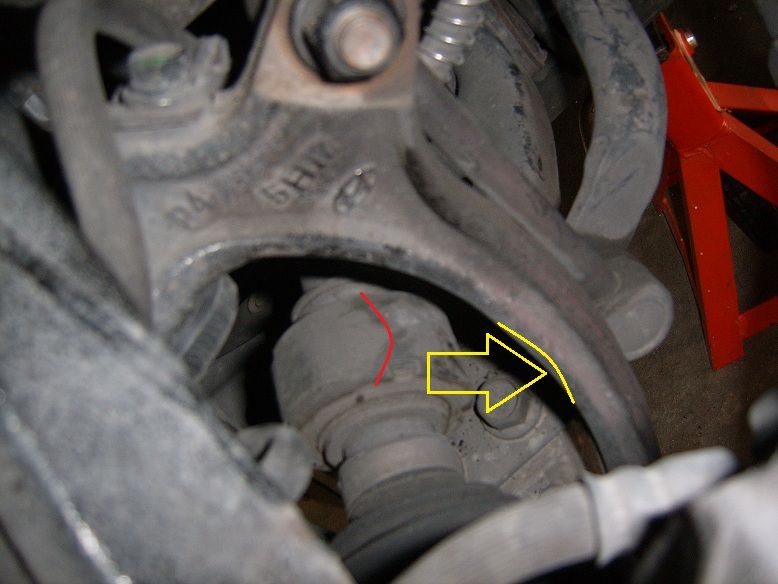
OR while you put pressure on it - I have seen people also just hammer out the ball joint (pictured in green arrow - tap it out). I did both but I gently tapped it out. It has been sitting with the car weight for years so it will be pretty hard, just tap it a couple of times while using the pressure of the other jack to push up control arm – The control arm pivots so don’t worry it can move up and down. Once it’s off, grab the fork

OR while you put pressure on it - I have seen people also just hammer out the ball joint (pictured in green arrow - tap it out). I did both but I gently tapped it out. It has been sitting with the car weight for years so it will be pretty hard, just tap it a couple of times while using the pressure of the other jack to push up control arm – The control arm pivots so don’t worry it can move up and down. Once it’s off, grab the fork
Step 6
Lean the main fork (with rotors/caliper assembly) the right hand side like in the picture below. It will be heavy. (disregard circles showing the bolts) Once fork it off you can lean to side.
![Image]()
You do not want the line to hold the weight so make sure the line is loose. Also try to lean the fork on this rubber piece circled in red in the pic. It will take the weight nicely.
Lean the main fork (with rotors/caliper assembly) the right hand side like in the picture below. It will be heavy. (disregard circles showing the bolts) Once fork it off you can lean to side.

You do not want the line to hold the weight so make sure the line is loose. Also try to lean the fork on this rubber piece circled in red in the pic. It will take the weight nicely.
Step 7
Locate the remaining two main bolts that hold the control arm – These two bolt the arm directly to the frame of the car.
Unbolting these is the trickiest part of this project. I am opting not to take out struts/spring assembly. Yes, there is not a lot of room, but honestly I thought taking out the assembly just to lower it wasn’t worth the hassle. Additionally, when it’s completely out, you won’t even have room for an air wrench gun in there unless you have one of those slim sockets that are air powered. Also this saves you about 20 minutes I believe. (More stuff to take out means more chances for me to run into trouble and or breaking something).
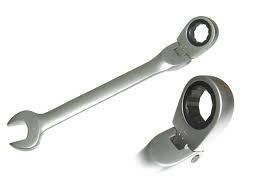
You can use the 14mm wrench pictured below.
![Image]()
It’s about the only size that fits in between the strut/coil and the bolt. Only problem is: a) chances are it will be too hard for you to turn the bolt loose with such a small handle and 2. You will have very little room to turn the wrench.
It’s about the only size that fits in between the strut/coil and the bolt. Only problem is: a) chances are it will be too hard for you to turn the bolt loose with such a small handle and 2. You will have very little room to turn the wrench.
So, you will need to use the big adjustable wrench. Grip the end of the smaller wrench with the adjustable head of the bigger wrench. You are sort of daisy chaining both wrenches to use them as one piece. Once tight, literally use the handle of the big one to loosen the bolt. You will have to use both hands: one to hold the smaller one in place close to where they connect, and use other hand on the bigger handle.
![Image]()
It will work. I am not that strong and I was able to do it with ease. The key is to simply un-tighten them with this big wrench; once it’s done, continue to unscrew them with the smaller wrench only. Yes, it will be tedious. But it beats having to take out strut assembly.
*Be careful not to tear your strut boot up the top – it’s not a very thick material – you won’t even touch it, but it is close to where you’re putting the wrench*
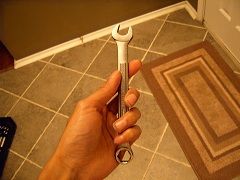
This wrench pictured below will probably work the best – I didn’t have one for 14 mm of course –
![Image]()
You will have to take the bolt directly outward in a straight line so you may have hit the spring coil like below.
![Image]()
You may, you may not – But if you do….no problem!
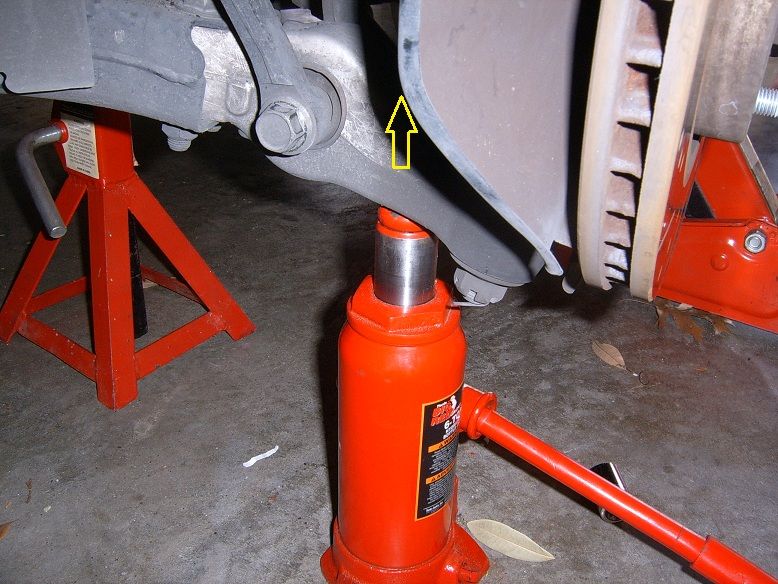
Simply put the second jack under the lower control arm – raise it up –
![Image]()
it will raise the entire strut/spring like in the picture below.
![Image]()
This will move the coil with enough room to take out bolt – and voila, that’s it for that.

You may, you may not – But if you do….no problem!
Simply put the second jack under the lower control arm – raise it up –
it will raise the entire strut/spring like in the picture below.
This will move the coil with enough room to take out bolt – and voila, that’s it for that.
Step 8
Place the new control arm in place. You may need a second person to line it while you carefully put the bolt straight through. If another person holds it in place, it’s much easier for you to find the hole while being careful not to mess with strut boot/bellow.
Step 9
Align the control arm to where it’s sitting as close to level as your eye can see. The ball joint bolt will later need to thrust into the fork perpendicular like the original. Once it’s about perpendicular tighten the two main bolts – You may use the same daisy chain method or I just simply tightened it with the smaller wrench – It was much easier to tighten then to loosen.
Step 10
Now Raise the car a bit with the original jack – The same jack that is currently holding the car up – You want the car to raise up enough to clear the ball joint bolt when you lean the fork back into place.
Step 11
Once the ball joint bolt lines up with the fork, simply lower the car a tad bit, or you may also raise the fork with your other jack again to reach the bolt (see picture below)
![Image]()
Either way you’re using the jacks to your advantage whether lowering or raising. This is actually the easiest part.
Either way you’re using the jacks to your advantage whether lowering or raising. This is actually the easiest part.
Step 12
Tighten the ball joint to the control with the 14 mm nut and put cotter pin back in place.
Step 13
Make sure to re attach brake fluid line back to the frame of the car with the two small bolts.
Step 14
Mount wheels back to your car and fasten lug nuts – Take jack stand out if you used one – Lower car to ground – Finally tighten wheels to spec with your torque wrench.
*I only have this side done because the other one will take a week to get here – Partsgeek took a while to even tell me the other one is out of stock – I suspect the procedure is very similar or identical*
I can tell you that now the left hand side is completely silent – It feels tight and less bouncy – The right hand side is still very squeaky – This confirms that it was upper control arm bushing and or ball joint – Problem solved after only 40 dollars in this case. The RH side was 56 bucks but this modification is roughly 100 dollars – One of the most rewarding – No more noise on LH side! I am happy.


 I Hate doing suspension mods cause now I want to do sway bar links, lower c.a. etc...it will never end lol but i need to pay this car off before I do those.


